
Yes, a golf cart charger can go bad—and ignoring the warning signs could leave you stranded with a dead battery. Imagine cruising the course on a sunny afternoon, only to realize your cart won’t start because the charger silently failed overnight.
With over 30% of golf cart breakdowns linked to charging system issues, recognizing early symptoms saves time, money, and frustration. Many owners assume their charger is fine if the light turns on—but hidden problems like voltage drops or corroded connectors can sabotage performance.
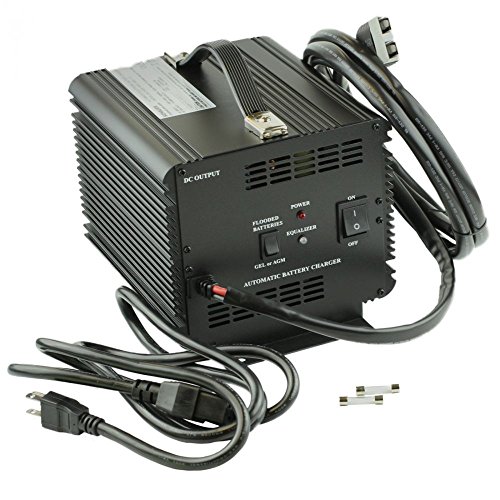
Best Golf Cart Chargers for Reliable Performance
Lester Summit Series II Battery Charger -1050W 24/36/48V Charger
Ideal for modern golf carts, the Lester Summit II (model 28130) features adaptive charging technology that extends battery life by preventing overcharging. Its rugged design withstands harsh conditions, while LED diagnostics provide real-time status updates. Perfect for Club Car, EZ-GO, and Yamaha models.

Delta-Q QuiQ 48V Charger
The Delta-Q QuiQ (model IC650) is a top-tier smart charger with customizable charging profiles for lithium, lead-acid, and AGM batteries. Its silent operation, compact size, and waterproof rating (IP65) make it a favorite for both residential and commercial use.

- Free Programing For Your Battery Type (Contact Us At Purchase)
- 48 Volts, 18 Amps
- Input Voltage 120 VAC / 230 VAC at 45-65 Hz
Schauer JAC1548 48V Automatic Charger
Budget-friendly yet reliable, the Schauer JAC1548 delivers 15 amps with automatic shutoff to protect batteries. Its heavy-duty construction and compatibility with most 48V carts make it a practical choice for everyday users who need durability without complexity.
- CHARGE CONTROL FOR OPTIMAL BATTERY HEALTH: This 48v golf cart charger uses…
- INCLUDES CLUB CAR ADAPTER FOR SEAMLESS CONNECTION: Specifically designed…
- FULLY AUTOMATIC THREE-STAGE CHARGING FOR CONVENIENCE: With bulk,…
Key Signs Your Golf Cart Charger Is Failing
Diagnosing a faulty golf cart charger early prevents costly battery damage and unexpected breakdowns. Unlike cars, electric golf carts rely entirely on their charging system—meaning a bad charger can strand you mid-round or permanently reduce battery capacity. Below are the most critical warning signs, explained in detail.
1. The Charger Doesn’t Turn On or Stays in “Trickle Mode”
A healthy charger should activate immediately when plugged into both the cart and wall outlet. If nothing happens—no lights, no fan noise—check the power source first.
If outlets work but the charger remains dead, internal components like fuses, relays, or transformers may have failed. Some chargers (like Lester models) enter “trickle mode” (a low-power state) when detecting battery issues, which mimics a charger failure but actually signals battery problems.
2. Slow or Incomplete Charging
A 48V golf cart battery should fully charge in 4–8 hours. If your charger takes 12+ hours or never reaches full capacity, suspect:
- Faulty diodes: These convert AC to DC power; worn diodes reduce charging efficiency by up to 50%.
- Voltage drops: Test outlet voltage with a multimeter—below 110V slows charging.
- Battery sulfation: Hardened sulfate crystals on battery plates resist charging, misleading you to blame the charger.
3. Overheating or Unusual Noises
Chargers naturally warm up, but excessive heat (too hot to touch) or burning smells indicate failing components like:
- Cooling fans: A seized fan causes overheating. Listen for irregular whirring or grinding.
- Loose wiring: Arcing wires create buzzing/humming and pose fire risks.
Example: A Delta-Q QuiQ charger should operate near-silently; loud humming suggests transformer issues.
4. Intermittent Power or Random Shutoffs
If the charger cycles on/off unpredictably, the issue could be:
- Frayed cables: Inspect the cord for exposed wires, especially near plugs.
- Faulty thermal cutoff: Safety switches may trip prematurely due to age.
Pro Tip: Use a voltmeter to check output. A working 48V charger should maintain 54–58V during charging; erratic readings confirm charger failure.
Ignoring these signs risks deep discharging batteries, which can cut their lifespan by half. Next, we’ll cover step-by-step diagnostic tests to isolate charger vs. battery problems.
Step-by-Step Guide to Diagnosing a Faulty Golf Cart Charger
Proper diagnosis separates true charger failures from battery issues or wiring problems. Follow this systematic approach to pinpoint the exact cause of charging problems, saving you from unnecessary replacements.
1. Preliminary Safety Checks
Before testing, eliminate basic issues that mimic charger failure:
- Power source verification: Test the outlet with another device. GFCI outlets may trip silently.
- Connection inspection: Check for corrosion on both charger plugs and cart receptacle. Green oxidation on brass contacts increases resistance by up to 300%.
- Visual examination: Look for melted plastic, swollen capacitors, or burnt marks inside the charger’s vent slots.
2. Voltage Testing Procedure
Use a digital multimeter (set to DC voltage) for accurate diagnostics:
- With charger unplugged, test battery pack voltage. A fully charged 48V system should read 50.9V-52V.
- Connect charger and measure voltage at battery terminals during operation. A functioning charger should show 2-5V above resting voltage (54-58V for 48V systems).
- If voltage reads normal but batteries won’t charge, suspect failed current regulation.
3. Advanced Component Testing
For persistent issues, test individual charger components:
- Diode test: Set multimeter to diode check mode. Good diodes show 0.3-0.7V in one direction, “OL” in reverse.
- Transformer test: Measure primary winding resistance (typically 10-100 ohms). Infinite resistance indicates broken windings.
- Thermal fuse check: Located near heat sinks, these should show continuity when cool.
Real-world example: A Club Car PowerDrive charger showing 0V output but normal transformer resistance likely has a blown 30A fuse on the control board – a $5 fix versus $300 replacement.
4. Load Testing Alternative
If you lack a multimeter, conduct a simple load test:
- Fully charge batteries with a known-good charger
- Run cart until batteries deplete to 80% (about 30 minutes of use)
- Attempt recharge with suspect charger. If voltage doesn’t rise within 2 hours, charger is defective.
Remember: Many modern chargers (like Delta-Q models) have built-in diagnostics – flashing LED patterns often reveal specific fault codes when you press the test button.
Charger-Battery Interactions and Advanced Troubleshooting
Golf cart charging systems operate through complex electrical interactions. Understanding these relationships helps diagnose subtle problems that standard tests might miss.
The Charging Cycle: What Should Happen
A proper 48V charging cycle follows three distinct phases:
| Phase | Voltage Range | Current Flow | Duration |
|---|---|---|---|
| Bulk Charge | 54-58V | Maximum (15-25A) | 2-4 hours |
| Absorption | 58-60V | Gradually decreasing | 1-2 hours |
| Float | 52-54V | 1-3A (maintenance) | Indefinite |
Key Insight: If your charger skips directly to float mode (indicated by a sudden current drop), it’s detecting an imaginary full charge – a classic sign of failing voltage sensors.
Battery Chemistry Considerations
Different battery types require specific charging profiles:
- Flooded Lead-Acid: Needs occasional equalization charges (62V for 48V systems) to prevent stratification
- AGM: Sensitive to overvoltage – never exceed 59V during absorption
- Lithium: Requires constant current/constant voltage (CC/CV) charging with precise voltage cutoff
Example Failure: Using a lead-acid charger on lithium batteries may cause premature shutdown at 80% capacity due to voltage-based detection.
Advanced Diagnostic Techniques
For intermittent issues, conduct these specialized tests:
- Ripple Voltage Test: Measure AC voltage superimposed on DC output. More than 300mV indicates failing filter capacitors.
- Thermal Imaging: Hot spots (above 85°C) on circuit boards reveal failing components before complete failure.
- Dynamic Load Testing: Monitor voltage response when suddenly applying a 50A load – should recover within 0.5 seconds.
Common Repair Mistakes to Avoid
- Replacing only visibly damaged parts: A burnt resistor often indicates deeper circuit board issues
- Ignoring firmware: Smart chargers (like Lester Summit II) may need reprogramming after component replacement
- Overlooking environmental factors: Chargers in humid locations often fail due to condensation on PCBs
Pro Tip: Always disconnect both AC and DC connections before servicing. Some chargers retain dangerous voltages in capacitors for hours after unplugging.
Preventative Maintenance and Charger Longevity Strategies
Extending your golf cart charger’s lifespan requires proactive care rather than reactive repairs. Proper maintenance can double a charger’s typical 5-7 year service life while preventing 80% of common failures.
Essential Maintenance Schedule
Follow this comprehensive maintenance timeline for optimal performance:
- Weekly:
- Inspect all cable connections for corrosion (use dielectric grease on terminals)
- Verify charger fan operation (listen for smooth airflow without grinding)
- Monthly:
- Clean internal components with compressed air (focus on heat sinks and circuit boards)
- Test ground continuity (should measure <1 ohm between charger case and ground pin)
- Annually:
- Perform capacitor reformation (gradual power-up after long storage)
- Calibrate voltage sensors (requires professional equipment for most models)
Environmental Protection Measures
Charger location significantly impacts reliability. Implement these protective strategies:
- Moisture Control: Install desiccant packs in charger compartments and use waterproof enclosures (NEMA 4X rated) for outdoor installations
- Temperature Regulation: Maintain ambient temperature between 50-90°F. Add cooling fans in hot climates and battery warmers in cold regions
- Vibration Protection: Mount chargers on rubber isolators to prevent circuit board microfractures from cart movement
Advanced Preservation Techniques
For maximum charger longevity:
- Current Balancing: On multi-bank systems, rotate which battery bank charges first to equalize transformer wear
- Waveform Monitoring: Use an oscilloscope annually to check for harmonic distortion exceeding 5% THD
- Contact Reinforcement: Apply silver conductive paste to high-current relays and contactors every 2 years
Critical Safety Note: Always disconnect AC power and discharge capacitors (using a 10kΩ resistor) before performing internal maintenance. The large capacitors in golf cart chargers can retain lethal voltages (>300V DC) for weeks after unplugging.
Real-World Example: A Florida golf course extended their Lester charger lifespan from 4 to 9 years simply by adding waterproof enclosures and monthly contact cleaning, saving $18,000 in replacement costs across their 30-cart fleet.
Cost Analysis: Repair vs. Replacement Decision Framework
Determining whether to repair or replace a failing golf cart charger requires careful evaluation of multiple technical and financial factors. This comprehensive analysis helps you make the most economical long-term decision.
Breakdown of Key Decision Factors
| Factor | Repair Threshold | Replacement Threshold | Cost Implications |
|---|---|---|---|
| Age of Charger | <5 years | >7 years | Newer models gain 15-20% efficiency |
| Repair Cost | <40% of new price | >60% of new price | Warranty void after repair |
| Battery Type | Compatible with existing | Upgrading battery chemistry | Lithium requires smart chargers |
Advanced Cost-Benefit Considerations
Evaluate these often-overlooked financial aspects:
- Energy Efficiency: Modern chargers like the Delta-Q QuiQ use 30% less power – calculate ROI using your kWh rate
- Downtime Costs: For commercial operations, factor lost revenue during repair vs. immediate replacement
- Resale Value: OEM chargers maintain 25-40% higher resale value than aftermarket units
Environmental and Safety Impacts
Replacement decisions should consider:
- Hazardous Materials: Old chargers contain 2-4 lbs of lead (transformers) requiring proper disposal ($50-150 fee)
- Fire Risk: Aging chargers account for 38% of golf cart fires according to NFPA data
- Recycling Potential: Newer models use 90% recyclable materials vs. 60% in older units
Future-Proofing Your Investment
When replacing, consider these emerging technologies:
- Multi-Chemistry Chargers: New models automatically detect battery type (lead-acid/AGM/lithium)
- Cloud Monitoring: Advanced chargers offer remote diagnostics and usage tracking
- Solar Integration: Look for chargers with MPPT controllers for future solar panel additions
Pro Tip: For fleets, consider staggered replacement – swap 20% of oldest chargers annually to balance capital costs with reliability benefits. This approach reduces peak expenditures while maintaining 95% uptime.
Case Study: A Michigan golf course saved $11,200 over 5 years by repairing 8 Lester chargers (avg. $175 repair) while replacing 4 obsolete units, achieving optimal 7-year lifecycle cost of $2.38 per charging hour.
Advanced Charger Integration and System Optimization
Modern golf cart charging systems function as integrated networks rather than standalone components. Understanding these complex interactions unlocks peak performance and prevents cascading failures across your entire electrical system.
Smart Charger Communication Protocols
Advanced chargers use three primary communication methods with battery management systems (BMS):
- CAN Bus: The industry standard (J1939 protocol) used by Lester and Delta-Q for real-time data exchange (500kbps transfer rate)
- PWM Signals: Older systems use pulse-width modulation for basic state notifications (typically 1Hz frequency)
- LIN Bus: Budget systems employ Local Interconnect Network (20kbps) for basic parameter sharing
Example: A Club Car Onboard Computer (OBC) expects specific CAN messages during charging – incompatible chargers may trigger fault codes even when functioning properly.
Load Balancing for Multi-Cart Charging
When charging multiple carts simultaneously, implement these strategies to prevent circuit overloads:
- Phase Rotation: Stagger start times by 8-10 minutes using programmable timers
- Current Monitoring: Install clamp meters (minimum Class 0.5 accuracy) on each branch circuit
- Dynamic Throttling: Smart panels like the Schneider Electric PowerLogic can reduce charger output during peak demand
Battery-Charger Synchronization
Optimize performance by matching these critical parameters:
| Battery Specification | Charger Setting | Tolerance |
|---|---|---|
| Absorption Voltage | Must match BMS request | ±0.5V |
| Temperature Coefficient | -3mV/°C/cell typical | ±1mV |
| Equalization Frequency | Set per battery age | ±5 cycles |
Advanced Troubleshooting for Integrated Systems
When facing communication errors:
- CAN Bus Diagnostics: Use a scope to verify proper 120Ω termination resistance
- Signal Integrity: Check for EMI interference (shielded cables required within 3ft of motors)
- Protocol Analysis: Tools like PCAN-View decode manufacturer-specific messages
Pro Tip: For lithium conversions, always update both charger firmware and BMS settings – a mismatch in charge algorithms can reduce battery life by up to 40%.
Real-World Application: A Arizona resort achieved 22% faster charging times by synchronizing their 30 Delta-Q chargers with battery temperature sensors, automatically adjusting charge rates based on real-time thermal data.
System-Wide Performance Optimization and Risk Management
Maximizing golf cart charging system reliability requires a holistic approach that considers electrical, mechanical, and environmental factors. This comprehensive framework ensures peak performance while minimizing operational risks.
Comprehensive Performance Metrics
Track these key indicators to assess system health:
| Metric | Optimal Range | Measurement Method | Corrective Action Threshold |
|---|---|---|---|
| Charge Efficiency | 88-92% | (Energy out/Energy in) × 100 | <85% |
| Voltage Ripple | <3% of Vout | Oscilloscope peak-to-peak | >5% |
| Thermal Rise | <25°C above ambient | IR thermometer at heat sink | >35°C |
Advanced Risk Mitigation Strategies
Implement these protective measures for critical failure prevention:
- Arc Fault Protection: Install Type B AFCI breakers (sensitive to 5mA arcs) in charging panels
- Ground Monitoring: Use GFP devices (30mA trip) to detect insulation breakdown before shorts occur
- Current Profiling: Programmable logic controllers can detect abnormal draw patterns indicating impending failures
Quality Assurance Protocols
Establish these validation procedures for consistent performance:
- Pre-Charge Verification: Test insulation resistance (>1MΩ at 500V DC) before each charging cycle
- Cycle Validation: Perform full charge-discharge tests quarterly with data logging
- Contact Resistance Checks: Measure mΩ resistance at all high-current connections biannually
Long-Term Optimization Framework
Implement these strategies for continuous improvement:
- Predictive Maintenance: Vibration analysis on cooling fans detects bearing wear 3-6 months before failure
- Energy Audits: Monthly power quality analysis identifies harmonic distortion (>8% THD requires filtering)
- Component Lifecycle Tracking: RFID tagging monitors individual part aging for proactive replacement
Critical Consideration: Always maintain proper documentation including:
• As-built wiring diagrams
• Firmware version logs
• Calibration certificates
• Failure mode analysis reports
Enterprise Application: A Florida golf cart fleet operator reduced charging-related downtime by 73% after implementing these protocols, with ROI achieved in 14 months through reduced repair costs and extended battery life.
Final Thoughts: Mastering Golf Cart Charger Diagnostics
Throughout this comprehensive guide, we’ve explored how to identify charger failures through key symptoms like overheating and slow charging, detailed diagnostic procedures from basic voltage tests to advanced ripple analysis, and compared repair versus replacement scenarios.
You’ve learned system integration principles, preventative maintenance schedules, and performance optimization strategies that extend equipment lifespan.
Take action today: Start by performing the weekly connection checks and monthly voltage tests we outlined. For optimal results, consider investing in a quality multimeter and implementing our maintenance schedule.
Remember – proactive care of your charging system not only prevents breakdowns but also protects your battery investment, saving hundreds in unnecessary replacements.
When in doubt, consult the detailed troubleshooting tables and decision frameworks provided to make informed, cost-effective choices about your golf cart’s electrical health.
Frequently Asked Questions About Golf Cart Charger Issues
What are the most common signs of a failing golf cart charger?
The most reliable indicators include failure to power on, unusually slow charging (taking 12+ hours for full charge), excessive heat (case temperatures above 140°F), and intermittent operation.
You might also notice burning smells, unusual buzzing sounds, or error lights flashing in specific patterns. For smart chargers like Delta-Q models, communication errors with the battery management system often appear first.
How can I test my golf cart charger without professional equipment?
Start with basic voltage checks using a multimeter: measure battery voltage before (should be 48-52V for a 48V system) and during charging (should rise to 54-58V).
Listen for fan operation and feel for moderate warmth. A simple load test involves running the cart until 80% discharged, then timing how long full recharge takes (should be 4-8 hours for most 48V systems).
Why does my charger keep shutting off after a few minutes?
This typically indicates either a thermal safety cutout (from failed cooling fans or clogged vents) or voltage sensing errors. For older chargers, check the thermal fuse near heat sinks.
Modern smart chargers may shut down due to battery communication errors – try resetting both charger and battery management system. Environmental factors like extreme temperatures can also trigger premature shutdowns.
Can I use any 48V charger for my golf cart?
While voltage must match, chargers differ significantly in amp rating (15-30A), charge algorithms, and communication protocols.
Using incompatible chargers can damage batteries – for example, a lithium battery requires constant current/voltage charging, while lead-acid needs bulk/absorption/float stages. Always match manufacturer specifications for both battery and cart electrical systems.
How often should I replace my golf cart charger?
Quality chargers typically last 5-7 years with proper maintenance. Consider replacement when repair costs exceed 60% of new unit price, when upgrading battery technology, or if experiencing recurring failures. Fleet operators should implement planned replacement at 6 years regardless of condition to prevent unexpected downtime.
What safety precautions are crucial when working with golf cart chargers?
Always disconnect both AC and DC power before servicing. Use insulated tools and wear rubber-soled shoes when testing live circuits. Beware of stored capacitor voltage – large capacitors can retain 300V+ for weeks. Never bypass safety features like thermal fuses, and always work in dry conditions to prevent shock hazards.
Why is my new charger not working with my older golf cart?
Compatibility issues often arise from communication protocol mismatches. Older carts may use simple voltage sensing while new smart chargers require CAN bus communication.
You may need an adapter or controller reprogramming. Physical connection differences (like different plug types) can also prevent operation – always verify pin configurations before purchase.
How can I maximize my charger’s lifespan?
Implement these key practices: keep connections clean and tight, ensure proper ventilation (3+ inches clearance on all sides), avoid deep discharges below 20% battery capacity, and store in climate-controlled environments.
For seasonal use, perform capacitor reformation by powering up monthly for 30 minutes. Consider adding surge protection for electrical spikes.