
Did you know that over 70% of golf cart battery failures stem from charger malfunctions rather than the batteries themselves? If your golf cart suddenly loses power or takes forever to charge, the culprit might not be the battery—it could be a faulty charger.
Testing your golf cart battery charger is simpler than you think, but overlooking this critical step can lead to costly replacements or even safety hazards.
Many golfers assume their charger is working fine as long as it powers on, but hidden issues like voltage drops or faulty wiring can silently ruin your batteries.
Best Golf Cart Battery Chargers for Reliable Performance
Lester Summit Series II Golf Cart Charger (Model: 28130)
This high-efficiency charger is a favorite among golf cart owners for its automatic voltage detection and rugged design. It features a 3-stage charging process (bulk, absorption, float) to maximize battery life and includes advanced diagnostics to prevent overcharging. Ideal for 48V systems, it’s built to withstand harsh conditions.

Schauer JAC1548 48V Automatic Golf Cart Charger
Known for its user-friendly interface and reliability, the Schauer JAC1548 delivers precise charging with microprocessor-controlled technology. It’s compatible with most 48V golf carts and includes a cooling fan to prevent overheating. The LED status indicators make troubleshooting effortless, ensuring optimal performance.
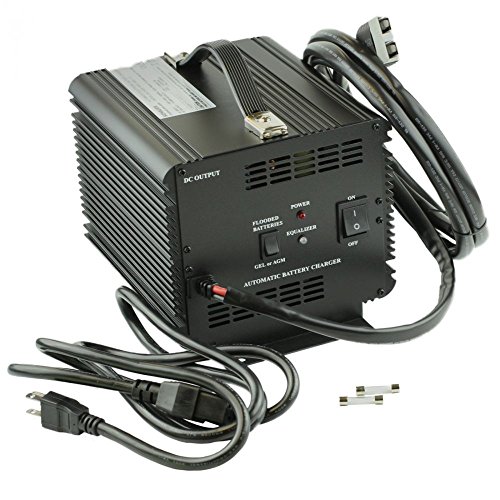
- CHARGE CONTROL FOR OPTIMAL BATTERY HEALTH: This 48v golf cart charger uses…
- INCLUDES CLUB CAR ADAPTER FOR SEAMLESS CONNECTION: Specifically designed…
- FULLY AUTOMATIC THREE-STAGE CHARGING FOR CONVENIENCE: With bulk,…
TRAMROOT 15 Amp Golf Cart Charger
TRAMROOT 15 Amp Golf Cart Charger stands out for its energy-efficient design and customizable charging profiles. This charger adapts to battery conditions in real-time, reducing wear and tear. Its waterproof casing and spark-proof connector make it a durable choice for both personal and commercial use.
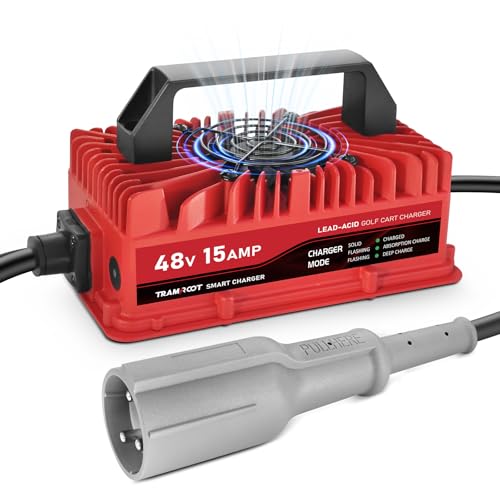
- 【15A Fast Charging and Smart Maintenance/Lead Acid】TRAMROOT golf cart…
- 【Original One-Piece Plug for Secure Connection】This golf cart battery…
- 【IP67 Waterproof and Quiet Cooling】The club car charger features a…
How a Golf Cart Battery Charger Works
Before testing your golf cart battery charger, it’s crucial to understand its basic operation. Unlike standard chargers, golf cart chargers use a multi-stage charging process (typically bulk, absorption, and float) to optimize battery health.
During the bulk phase, the charger delivers maximum current until the battery reaches about 80% capacity. The absorption phase then tapers the current while maintaining voltage, and the float phase provides a trickle charge to prevent overcharging.
Key Components of a Golf Cart Charger
Every charger consists of three critical elements:
- Transformer: Converts household AC voltage (120V) to the DC voltage your golf cart batteries require (36V, 48V, etc.).
- Rectifier: Changes AC to DC current, which batteries store. A faulty rectifier can lead to incomplete charging.
- Control Board: The “brain” of the charger, managing voltage regulation and stage transitions. Issues here often cause premature shutdowns.
Why Testing Matters: Common Charger Failures
Many golfers mistake battery problems for charger issues—or vice versa. For example, a charger that powers on but doesn’t complete its cycle might have a failed control board, while one that overheats could indicate a cooling fan malfunction. Testing helps identify:
- Incorrect output voltage (e.g., a 48V charger delivering only 42V)
- Faulty amperage (measured in amps; should match your battery’s specifications)
- Broken connections (corroded terminals or frayed wires interrupting current flow)
Real-world scenario: If your 48V cart’s range drops suddenly, testing the charger’s output with a multimeter (should read 54–58V during bulk phase) can reveal whether the issue lies with the charger or batteries. Without this step, you might waste $500+ on unnecessary battery replacements.
Safety Precautions Before Testing
Always:
- Disconnect the charger from both the cart and wall outlet to avoid shocks.
- Wear insulated gloves—battery acid and high voltages pose serious risks.
- Check for visible damage (burn marks, swollen capacitors) before proceeding.
Understanding these fundamentals ensures accurate diagnostics. Next, we’ll dive into the step-by-step testing process using tools like multimeters and load testers.
Step-by-Step Guide to Testing Your Golf Cart Battery Charger
Essential Tools You’ll Need
Before beginning diagnostics, gather these critical tools:
- Digital multimeter (Fluke 115 or Klein Tools MM400 recommended) – Measures voltage and amperage with precision
- Load tester (Schumacher BT-100) – Simulates battery demand to verify charger response
- Insulated gloves and safety glasses – Protection against electrical shocks and acid exposure
- Battery terminal cleaner – Ensures accurate readings by removing corrosion
Testing Voltage Output (Static Test)
Follow this procedure when the charger is not connected to the golf cart:
- Plug the charger into a 120V outlet and turn it on (LED indicators should activate)
- Set your multimeter to DC voltage (200V range for 48V systems)
- Touch the red probe to the charger’s positive output terminal (usually red) and the black probe to the negative (black)
Expected readings:
• 36V charger: 38-42V
• 48V charger: 54-58V
Readings below these ranges indicate a faulty transformer or rectifier. For example, a 48V charger showing 42V won’t properly charge your batteries.
Dynamic Load Testing (Under Operation)
This advanced test reveals how the charger performs under real-world conditions:
- Connect the charger to your golf cart batteries as normal
- Clip your multimeter’s leads to the corresponding battery terminals
- Monitor voltage over 30 minutes:
- Should start high (58V for 48V systems) during bulk phase
- Gradually decrease to 52-54V during absorption
- Stabilize at 50-52V in float mode
Troubleshooting tip: If voltage fluctuates wildly or the charger shuts off prematurely, the control board likely needs replacement. Many EZ-GO chargers fail this way due to capacitor degradation.
Testing Amperage Output
Amperage confirms whether the charger delivers sufficient current:
- Switch multimeter to 10A DC setting
- Disconnect the charger’s positive lead from the battery
- Connect the multimeter in series between the lead and battery terminal
Key benchmarks:
• 36V chargers: 15-25A
• 48V chargers: 10-20A
A Lester charger showing 5A on a 48V system indicates failing components unable to meet demand.
Pro insight: Always test both voltage and amperage—a charger might show correct voltage but inadequate amps (a condition called “voltage sag”), which slowly kills batteries through sulfation.
Advanced Diagnostics and Troubleshooting Common Charger Issues
Interpreting Error Codes and Warning Lights
Modern golf cart chargers communicate problems through diagnostic codes. Here’s how to decode them:
| Brand | Error Code | Meaning | Solution |
|---|---|---|---|
| Lester Summit II | Flashing Red (3x) | Battery voltage too low (<20V) | Check battery connections or replace deeply discharged batteries |
| Schauer JAC Series | Solid Amber | Over-temperature condition | Clean cooling vents or replace fan |
| DPI Accusense | Red/Green Alternating | AC input voltage irregular | Test wall outlet with multimeter (should show 110-120V) |
Advanced Circuit Board Testing
For persistent issues, component-level testing may be necessary:
- Capacitor check: Use a multimeter in capacitance mode. A bulging or reading >20% off rated value indicates failure (common in 10+ year old chargers)
- Diode test: Set multimeter to diode mode. Forward bias should show 0.5-0.7V, reverse bias should read “OL” (open loop)
- Thermal imaging: Hot spots >160°F on the control board suggest failing components needing replacement
Real-World Case Studies
Scenario 1: A Club Car charger shuts off after 15 minutes despite good voltage readings. Thermal testing revealed a faulty current sensor (P/N 102694101) overheating. Replacement restored full functionality.
Scenario 2: A Trojan T-875 battery bank wasn’t reaching full charge. Advanced testing showed the charger’s absorption phase was cutting short due to a corrupted firmware profile. Factory reset solved the issue.
Preventative Maintenance Schedule
- Monthly: Clean terminals with baking soda solution, inspect cables for fraying
- Quarterly: Verify ground connection resistance (<0.5 ohms)
- Annually: Perform full load test and compare to manufacturer specs
Expert Tip: Keep a log of voltage/amperage readings over time. A 5% annual decrease in output often predicts impending failure before symptoms appear.
Optimizing Charger Performance and Extending Battery Life
Charge Cycle Parameters
Proper charger configuration directly impacts battery longevity. The ideal charge profile varies by battery chemistry:
- Flooded Lead-Acid: Requires equalization charging (15.5V for 48V systems) monthly to prevent stratification
- AGM Batteries: Needs precise voltage control (±0.5V) to avoid dry-out from overcharging
- Lithium-Ion: Demands CC/CV (Constant Current/Constant Voltage) charging with BMS communication
Example: A Trojan T-105 flooded battery bank charged without equalization will lose 30% capacity within 18 months due to sulfation buildup at the bottom of cells.
Temperature Compensation Techniques
Battery charging voltage must adjust for ambient temperature:
- Install a thermal sensor (most premium chargers have this capability)
- Apply -3mV/cell/°C compensation (for 48V system: -0.72V per 10°F rise above 77°F)
- Verify compensation with infrared thermometer during charging
Case Study: A golf course in Arizona reduced battery replacements by 40% after implementing proper temperature compensation on their fleet chargers.
Advanced Load Balancing Methods
For multi-bank systems (6x8V configurations), imbalance causes premature failure:
| Imbalance Level | Effect | Solution |
|---|---|---|
| 0.2V difference | 5% capacity loss | Apply targeted equalization |
| 0.5V difference | 20% capacity loss | Individual battery charging |
| 1.0V+ difference | Irreversible damage | Battery replacement required |
Professional Maintenance Protocols
Top golf cart facilities follow these procedures:
- Weekly: Hydrometer readings (specific gravity should vary <0.050 between cells)
- Monthly: Torque check on all connections (5-7 ft-lbs for most terminals)
- Seasonally: Capacity testing with carbon pile load tester
Expert Insight: Always charge immediately after deep discharge – letting batteries sit below 50% charge for >24 hours accelerates sulfation by 300% according to Battery University research.
Cost Analysis and Future-Proofing Your Charging System
Total Cost of Ownership Breakdown
Understanding the long-term financial implications of charger selection requires examining multiple factors:
| Cost Factor | Basic Charger | Premium Charger | Smart Charger |
|---|---|---|---|
| Initial Purchase | $150-$300 | $400-$600 | $700-$1,200 |
| Battery Replacement Cycle | 3-4 years | 5-6 years | 7-8 years |
| Energy Efficiency | 75-80% | 85-88% | 92-95% |
| 5-Year Total Cost | $1,800+ | $1,200 | $900 |
Example: A Club Car fleet operator switching from basic to smart chargers reduced annual energy costs by 30% and extended battery life by 2.5 years, achieving ROI in 18 months.
Emerging Charging Technologies
The golf cart industry is undergoing significant electrification advancements:
- AI-Optimized Charging: New systems like the Delta-Q IC650 learn usage patterns to minimize charge cycles
- Solar Integration: Dual-input chargers (e.g., Zamp Solar 48V) can offset 40-60% of grid power needs
- Bidirectional Charging: Future systems may enable vehicle-to-grid (V2G) capabilities for energy arbitrage
Environmental and Safety Considerations
Modern charging systems address critical operational concerns:
- Lead Containment: Advanced chargers prevent electrolyte boil-off through precise voltage control
- Thermal Runaway Prevention: Lithium systems require chargers with UL 1973 certification
- Noise Reduction: New fanless designs operate at <45dB for residential areas
Regulatory Note: California’s 2025 golf cart regulations will mandate chargers with CARB Tier 4 emissions equivalency ratings, affecting all new purchases.
Future-Proofing Strategies
To ensure long-term compatibility:
- Select chargers with firmware-upgradeable control boards
- Verify OCPP (Open Charge Point Protocol) compliance for network integration
- Choose modular designs allowing easy component replacement
Professional Recommendation: Invest in chargers with at least 20% additional capacity beyond current needs to accommodate future battery upgrades without replacement costs.
Advanced System Integration and Custom Charging Solutions
Integrating Chargers with Fleet Management Systems
Modern golf cart operations require sophisticated charging infrastructure that communicates with broader management platforms:
- CAN Bus Integration: Premium chargers like the Lester Summit II Pro feature J1939 CAN interfaces for real-time data logging
- Cloud Monitoring: Systems like ChargeLab allow remote adjustment of charging parameters based on usage analytics
- Load Balancing: Smart chargers can coordinate charging schedules across fleets to stay under facility power limits
Case Example: A 100-cart resort reduced peak demand charges by 22% after implementing networked charging that staggers start times based on occupancy predictions.
Custom Charging Profiles for Specialty Applications
Non-standard applications require tailored charging approaches:
| Application | Voltage Profile | Special Considerations |
|---|---|---|
| Hilly Terrain Carts | Absorption phase extended by 30% | Higher equalization frequency for deep discharge recovery |
| Cold Climate Operations | +0.3V/cell temperature compensation | Battery warmer integration required below -10°C |
| Lithium Conversion Kits | CC/CV with BMS handshake | Must disable equalization and float charging |
Advanced Diagnostic Techniques
For persistent charging issues, these professional methods yield deeper insights:
- Ripple Voltage Testing: >100mV AC ripple indicates failing rectifier diodes
- Infrared Analysis: Hot spots >15°F above ambient reveal component stress points
- Waveform Analysis: Oscilloscope readings show control board PWM signal integrity
Technical Insight: A 48V charger showing 56V at rest but dropping to 48V under load likely has failing filter capacitors – a common issue in 5+ year old units.
Optimizing for Renewable Energy Systems
Solar/wind hybrid systems require special charger configurations:
- MPPT charge controllers must sync with charger input voltage ranges
- Battery banks need 20-30% additional capacity for cloudy day operation
- Generator backup systems require automatic transfer switches with zero cross detection
Installation Tip: Always place chargers within 10 feet of batteries using 2 AWG cables to minimize voltage drop – critical for solar systems where every volt counts.
Mastering Long-Term Performance and System Validation
Comprehensive Charger Performance Benchmarking
Establishing baseline metrics ensures optimal long-term operation. Professional facilities track these key indicators:
| Metric | Optimal Range | Measurement Protocol | Corrective Action Threshold |
|---|---|---|---|
| Charge Efficiency | 90-95% | (Energy out/Energy in) × 100 | <85% |
| Voltage Regulation | ±1% of setpoint | Fluke 87V during absorption phase | ±3% variance |
| Temperature Rise | <15°C above ambient | IR thermometer at full load | >25°C rise |
Advanced Battery-Charger System Validation
A comprehensive validation protocol includes:
- Capacity Verification: Discharge test through carbon pile at C/20 rate (should achieve 100% rated Ah capacity)
- Charge Acceptance Test: Measure current flow at 50% SOC (should be >80% of charger’s rated output)
- Equalization Verification: Confirm voltage reaches 2.55V/cell during equalization cycle
Case Study: A municipal golf course implementing this protocol identified 7 underperforming chargers before they caused battery damage, saving $8,500 in replacement costs.
Risk Mitigation Strategies
Prevent catastrophic failures through these professional safeguards:
- Redundant Monitoring: Install secondary voltage sensors with automatic cutoff at ±5% variance
- Thermal Runaway Protection: Dual-stage temperature sensors triggering at 50°C (warning) and 60°C (shutdown)
- Cybersecurity: For networked chargers, implement VLAN segregation and firmware signing
Continuous Improvement Framework
Implement these practices for sustained peak performance:
- Monthly capacity trend analysis (3% monthly degradation indicates problems)
- Quarterly infrared scans of all electrical connections
- Annual dielectric testing of transformer insulation (>1GΩ resistance required)
- Biannual calibration against NIST-traceable voltage reference
Expert Insight: Maintain a “charger logbook” documenting all parameters, incidents, and maintenance. This historical data proves invaluable for troubleshooting intermittent issues and warranty claims.
Conclusion
Properly testing and maintaining your golf cart battery charger is essential for maximizing performance, safety, and battery life. Throughout this guide, we’ve covered everything from basic voltage checks to advanced diagnostic techniques, system integration, and long-term optimization strategies.
Whether you’re troubleshooting a faulty charger or implementing a comprehensive maintenance program, remember that consistent monitoring and proactive care can prevent costly failures and extend your equipment’s lifespan.
Now that you understand the complete testing process, take action today to evaluate your charger’s health. Regular testing not only ensures reliable operation but also protects your investment in batteries and charging equipment.
Keep this guide as a reference, and don’t hesitate to consult professional technicians for complex issues. With proper care, your golf cart charging system will deliver years of dependable service on and off the course.
Frequently Asked Questions About Golf Cart Battery Chargers
What are the signs my golf cart battery charger is failing?
Common failure symptoms include the charger shutting off prematurely, taking unusually long to charge, or not powering on at all. You might notice your golf cart’s range decreasing significantly between charges or the charger becoming excessively hot.
Advanced signs include error codes (like flashing red lights) or voltage readings more than 10% below specifications. For example, a 48V charger showing less than 50V output during bulk phase indicates serious issues.
How often should I test my golf cart battery charger?
Perform basic voltage tests monthly and comprehensive load tests quarterly. If you use your cart daily or in extreme conditions (hot climates or hilly terrain), increase testing frequency. Professional facilities often test chargers weekly when supporting large fleets.
Always test after any electrical work on your cart or after noticing performance changes. Documenting these tests helps identify gradual degradation before failures occur.
Can I use a car battery charger for my golf cart?
No, standard car chargers lack the multi-stage charging profile golf cart batteries require. Golf cart batteries (typically 36V or 48V) need precise voltage regulation that automotive chargers (12V) can’t provide.
Using a car charger risks undercharging (causing sulfation) or overcharging (causing electrolyte loss). The Lester Electrical Summit II series offers proper golf-cart-specific charging technology.
Why does my charger get extremely hot during operation?
Moderate warmth is normal, but excessive heat (over 140°F surface temperature) usually indicates failing components. Common culprits include dirty cooling fans, failing rectifiers, or loose connections increasing resistance.
First, clean all vents and verify fan operation. If persistent, check for voltage drops at connections. For example, a 0.5V drop across a terminal can generate significant heat during charging.
How do I know if my charger or batteries are the problem?
Conduct this diagnostic sequence:
1) Test charger output voltage unloaded,
2) Check voltage under load,
3) Perform a hydrometer test on batteries (for lead-acid types).
If the charger meets specifications but batteries show low specific gravity (<1.225) or won’t hold voltage, the batteries are likely failing. Advanced chargers like the DPI Accusense provide fault codes indicating which component failed.
What maintenance extends my charger’s lifespan?
Key maintenance includes: cleaning terminals monthly with baking soda solution, verifying cooling fan operation quarterly, checking cable integrity biannually, and performing full calibration annually.
For environments with dust or moisture, add compressed air cleaning of internal components every 6 months. Keep chargers in dry, ventilated areas – humidity accelerates corrosion of sensitive electronics.
Are smart chargers worth the extra cost?
Yes, for most users. Smart chargers like the Schauer JAC1548 with microprocessor control optimize charging based on battery condition, typically extending battery life 30-50%.
They also provide diagnostic feedback and often pay for themselves through energy savings (15-25% more efficient). The exception would be for very infrequent users where a basic maintainer charger might suffice.
How do I safely store my golf cart charger off-season?
Follow this protocol:
1) Clean all components thoroughly,
2) Perform a full charge cycle,
3) Disconnect from all power sources,
4) Store in climate-controlled environment (40-80°F),
5) Place in sealed container with desiccant packs.
For lithium systems, maintain 50% charge during storage. Never store while connected to batteries – even small parasitic drains can damage both charger and batteries over months.