
Did you know that 80% of golf cart breakdowns are caused by battery issues? A failing battery doesn’t just leave you stranded—it can silently drain your wallet with costly replacements.
Imagine cruising the course one minute, then hearing the dreaded click of a dead cart the next. Many owners assume their batteries are fine until it’s too late, but the truth is, regular testing can double your battery’s lifespan.
Best Tools for Testing Golf Cart Batteries
Fluke 115 Digital Multimeter
The Fluke 115 is a top-tier multimeter for precise voltage and resistance readings. Its rugged design, True-RMS accuracy, and easy-to-read display make it perfect for diagnosing 6V, 8V, or 12V golf cart batteries. The built-in continuity tester helps spot wiring issues, while its CAT III 600V safety rating ensures reliability.
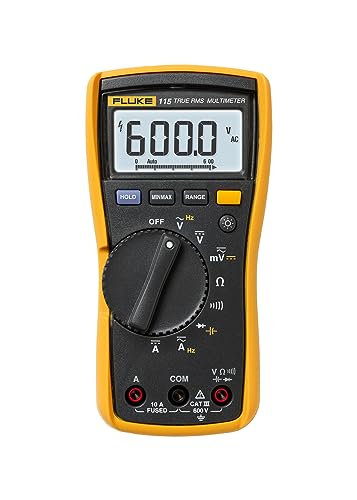
- Compact True-rms digital multimeter for field technicians
- Measures True-rms voltage and current with plus resistance, continuity,…
- Min/Max/Average to record signal fluctuations
Schumacher BT-100 100-Amp Battery Load Tester
For heavy-duty testing, the Schumacher BT-100 delivers accurate load tests to reveal weak cells under real-world conditions. Its analog needle display clearly shows battery health, and the adjustable knobs work with 6V, 12V, and 12V/24V systems. A must-have for deep-cycle battery diagnostics.

- 1pc Switch For Schumacher BT-100 Battery Load Tester Voltmeter – 100 Amp (…
- Accurate Testing: The Schumacher BT-100 Battery Load Tester and Voltmeter…
- Versatile Voltmeter: This tester features a built-in voltmeter that allows…
NOCO GENIUS5 5-Amp Smart Battery Charger
The NOCO GENIUS5 isn’t just a charger—it’s a battery maintainer with a built-in voltage meter. Its repair mode revives deeply discharged batteries, while the LCD screen shows real-time voltage. Compatible with all lead-acid golf cart batteries, it’s ideal for testing and extending battery life.

- MEET THE GENIUS5 — Similar to our G3500, just better. It’s 34% smaller…
- DO MORE WITH GENIUS — Designed for 6-volt and 12-volt lead-acid (AGM,…
- ENJOY PRECISION CHARGING — An integrated thermal sensor dynamically…
Golf Cart Battery Basics: Voltage, Type, and Maintenance Needs
Before testing your golf cart battery, you need to understand its fundamental characteristics. Most golf carts use 6V, 8V, or 12V deep-cycle lead-acid batteries, wired in series to create 36V or 48V systems.
Unlike car batteries, deep-cycle batteries are designed for prolonged, steady power output—perfect for long rounds on the course. However, this also means they require more frequent testing and maintenance to prevent sulfation (a buildup of lead sulfate crystals that reduces performance).
Voltage Matters: How to Identify Your Battery System
Each battery in your cart will have its voltage clearly labeled, but the total system voltage depends on how they’re connected. For example:
- Six 6V batteries in series = 36V system (common in older carts)
- Six 8V batteries in series = 48V system (modern standard)
- Four 12V batteries in series = 48V system (less common but simpler)
Misidentifying your system can lead to inaccurate test results. A quick check: if your charger outputs ~38V, you have a 36V system; ~51V indicates 48V.
Battery Types: Flooded vs. AGM vs. Lithium
Flooded lead-acid batteries (the most common) require regular water refills and vented battery boxes due to off-gassing. AGM (Absorbent Glass Mat) batteries are sealed and maintenance-free but cost 20–30% more.
Lithium-ion batteries (e.g., EcoBattery or RoyPow) are lightweight and long-lasting but need specialized testers—standard lead-acid methods won’t work.
When to Test: Key Warning Signs
Don’t wait for total failure. Test immediately if you notice:
- Slow acceleration or reduced hill-climbing power
- Inconsistent run time (e.g., dying after 9 holes instead of 18)
- Visible corrosion on terminals (white/green powder)
- Swollen battery case (indicates overheating or overcharging)
Pro tip: Test monthly during peak season and before/after winter storage—temperature swings accelerate battery degradation.
Understanding these fundamentals ensures your tests are accurate and actionable. Next, we’ll dive into the step-by-step testing methods professionals use.
Step-by-Step Guide to Testing Your Golf Cart Battery
Proper battery testing requires more than just checking voltage – it’s about evaluating the battery’s true health under different conditions. Follow this professional testing protocol to get accurate results and catch problems early.
Safety First: Essential Precautions
Before testing:
- Wear protective gear – acid-resistant gloves and safety glasses are mandatory when handling flooded batteries
- Work in ventilated areas – batteries release explosive hydrogen gas during charging/testing
- Disconnect all loads – turn off lights, accessories, and remove the key to prevent false readings
Never place metal tools across terminals – a single spark can ignite battery gases.
Voltage Testing: The First Diagnostic
Using your multimeter (like the recommended Fluke 115):
- Set to DC voltage (20V range for 6V/8V batteries, 200V for 48V systems)
- Place red probe on positive (+), black on negative (-) terminal
- Check readings:
- 12.73V = 100% charged (for 12V battery)
- 12.06V = 50% charged
- Below 11.8V = severely discharged
Note: Test each battery individually in a series system – one weak battery drags down the entire pack.
Load Testing: The Real Performance Check
Voltage alone doesn’t reveal capacity loss. For accurate results:
- Fully charge batteries before testing
- Connect load tester (like Schumacher BT-100) for 10-15 seconds
- Healthy batteries maintain voltage within:
- 6V battery: 4.8V minimum under load
- 8V battery: 6.4V minimum under load
If voltage drops below these thresholds or fluctuates wildly, the battery is failing.
Pro Tip: For flooded batteries, check specific gravity with a hydrometer (1.265 = fully charged) to verify voltage readings. This catches “surface charge” false readings.
Advanced Battery Analysis: Interpreting Results and Troubleshooting
Understanding your test results is crucial for proper battery maintenance. This section will help you decode what your readings really mean and how to address common issues.
Reading Between the Numbers: Voltage Analysis
| Voltage Reading (12V Battery) | State of Charge | Recommended Action |
|---|---|---|
| 12.73V+ | 100% charged | Proceed with load test |
| 12.4V-12.6V | 75% charged | Recharge before testing |
| 12.2V | 50% charged | Potential sulfation risk |
| Below 11.8V | Severely discharged | Check for dead cells |
Common Battery Problems and Solutions
Sulfation: The silent battery killer occurs when lead sulfate crystals harden on plates. Symptoms include:
- Slow charging (takes unusually long to reach full voltage)
- Reduced capacity despite “full” voltage reading
- Batteries getting hot during charging
Solution: Use a desulfation charger (like NOCO GENIUS5) or apply an equalization charge to flooded batteries.
Cell Imbalance: In battery packs, one weak cell can drag down the entire system. Test each battery individually – variations over 0.2V between identical batteries indicate problems. Rotate battery positions annually to equalize wear.
When to Replace vs. Repair
Consider replacement when:
- Voltage drops more than 20% under load test
- Specific gravity varies more than 0.05 between cells
- Batteries won’t hold charge overnight
For flooded batteries, try these repairs first:
- Clean corroded terminals with baking soda solution
- Top up with distilled water (never tap water)
- Apply equalization charge
Pro Tip: Always replace all batteries in a pack simultaneously. Mixing old and new batteries reduces lifespan by up to 40%.
Optimizing Battery Performance: Maintenance and Long-Term Care Strategies
Proper maintenance can extend your golf cart battery life by 2-3 years. This section reveals professional-grade care techniques that go beyond basic charging to maximize performance and longevity.
The Complete Charging Protocol
Charging is more complex than simply plugging in overnight. Follow this optimized charging routine:
- Charge after every use – Even partial discharges accelerate sulfation
- Use the right charger – Match voltage (36V/48V) and amperage (15-30A for most carts)
- Charge in sequence – For multiple battery setups, charge the most discharged pack first
- Cool down period – Wait 30 minutes after use before charging to prevent thermal stress
Advanced Tip: For flooded batteries, perform an equalization charge monthly – a controlled overcharge that mixes electrolytes and removes stratification.
Water Maintenance for Flooded Batteries
Proper watering is critical:
- Check levels weekly during peak season
- Fill only with distilled water to 1/4″ below fill wells
- Never expose plates – this causes immediate sulfation
- Water after charging, not before (to prevent overflow)
Warning: Overwatering dilutes electrolyte strength, while underwatering exposes plates to air oxidation.
Storage Procedures for Off-Season
Improper storage destroys more batteries than actual use. Follow this 3-step preservation method:
- Clean and charge – Remove corrosion and bring to 100% charge
- Disconnect – Remove all cables to prevent parasitic drain
- Climate control – Store in cool (50-60°F), dry place with battery maintainer
Pro Tip: For storage over 6 months, use a pulse-type maintainer that prevents sulfation without overcharging.
Performance Monitoring System
Install a battery monitoring system (like the Renogy 500A Battery Monitor) to track:
- State of charge in real-time
- Depth of discharge cycles
- Total amp-hours consumed
- Estimated runtime remaining
This $100 investment can pay for itself by preventing premature replacements.
Battery Technology Comparison: Choosing the Right Solution for Your Needs
Modern golf cart owners now face multiple battery technology options, each with distinct advantages and trade-offs. This section provides a detailed comparison to help you make an informed decision based on your specific usage patterns and budget.
Technology Breakdown: Performance vs. Cost
| Battery Type | Lifespan (Cycles) | Maintenance | Weight | Cost (48V System) |
|---|---|---|---|---|
| Flooded Lead-Acid | 500-800 | High (watering, cleaning) | 60-75 lbs each | $800-$1,200 |
| AGM | 600-1,000 | None | 55-70 lbs each | $1,500-$2,000 |
| Lithium-Ion | 2,000-5,000 | None | 30-40 lbs each | $2,500-$4,000 |
Total Cost of Ownership Analysis
While lithium batteries have higher upfront costs, consider these long-term factors:
- Energy Efficiency: Lithium provides 95% usable capacity vs. 50% for lead-acid
- Replacement Cycles: 1 lithium pack typically outlasts 3-5 lead-acid sets
- Charging Costs: Lithium charges 30% faster with 15-20% less energy waste
- Resale Value: Carts with lithium command $800-$1,200 premium
Example: Over 10 years, a $3,500 lithium system may cost less than repeated $1,200 lead-acid replacements.
Environmental and Safety Considerations
Lead-Acid:
- Contains toxic lead and sulfuric acid
- Requires proper recycling (95% recyclable)
- Off-gassing requires ventilation
Lithium-Ion:
- No toxic materials (but mining concerns exist)
- Fire risk if damaged/punctured
- Built-in BMS prevents overcharge/overheat
Future Trends and Innovations
The industry is moving toward:
- Smart BMS Integration: Real-time monitoring via Bluetooth
- Solid-State Batteries: Expected 2x energy density by 2027
- Fast-Charge Systems: 80% charge in 15 minutes becoming available
Pro Tip: If keeping carts long-term, lithium’s falling prices (down 40% since 2018) make it increasingly cost-effective.
Advanced Diagnostic Techniques: Professional-Grade Battery Analysis
Beyond basic voltage checks, professional technicians use sophisticated methods to evaluate battery health. These advanced techniques can help you identify emerging problems before they cause performance issues.
Internal Resistance Testing
Internal resistance (IR) is the most accurate indicator of battery health:
- Measurement: Requires specialized IR tester (like Midtronics MDX-650P)
- Healthy Range:
- 6V battery: 0.005-0.015 ohms
- 8V battery: 0.007-0.020 ohms
- Warning Signs: Resistance increases >20% from baseline indicates deterioration
Example: A 6V battery showing 0.028 ohms has significant plate degradation, even if voltage tests normal.
Capacity Testing Through Discharge Cycles
The gold standard for evaluating true battery capacity:
- Fully charge battery and record starting voltage
- Apply controlled load (typically 75A for golf cart batteries)
- Measure time until voltage drops to:
- 5.25V for 6V batteries
- 7.0V for 8V batteries
- Compare to manufacturer’s amp-hour rating
Pro Tip: Capacity below 80% of original rating means replacement should be considered.
Thermal Imaging Analysis
Infrared cameras reveal hidden problems:
- Hot Spots: Indicate internal shorts or connection issues
- Temperature Variations: >5°F difference between cells signals imbalance
- Charging Patterns: Abnormal heat during charging suggests sulfation
Case Study: A battery showing 130°F at one terminal during charging revealed a corroded cable connection invisible to visual inspection.
Electrolyte Analysis for Flooded Batteries
Professional shops use lab-grade refractometers to:
- Measure specific gravity to ±0.001 accuracy
- Detect electrolyte contamination
- Identify stratification (density variations in electrolyte layers)
Advanced Technique: Adding EDTA solution to electrolyte samples can temporarily reverse sulfation for testing accuracy.
These methods provide the complete picture of battery health that basic voltage tests cannot reveal, allowing for predictive maintenance rather than reactive replacement.
System Integration and Performance Optimization Strategies
Maximizing golf cart battery performance requires understanding how your power system works as a complete ecosystem. This section reveals professional techniques for optimizing the entire electrical system.
Battery-to-Motor Efficiency Optimization
| Component | Efficiency Impact | Optimization Technique |
|---|---|---|
| Cable Connections | Up to 15% voltage drop | Upgrade to 2/0 AWG copper cables with tinned lugs |
| Controller | 10-20% efficiency variance | Program regenerative braking to recover 5-8% energy |
| Motor | 5-10% loss in worn motors | Annual bearing maintenance and brush replacement |
Advanced Charging System Configuration
Optimize your charging routine based on usage patterns:
- Fleet Carts: Implement staged charging (bulk/absorption/float) during off-peak hours
- Weekend Users: Use maintainer mode during weekdays
- Hilly Terrain: Increase absorption charge time by 20% to compensate for deeper discharges
Pro Tip: Install a charger data logger to analyze charging patterns and detect anomalies.
Comprehensive Battery Management Approach
Implement these professional maintenance protocols:
- Monthly:
- Terminal cleaning with anti-corrosion gel
- Equalization charge for flooded batteries
- Quarterly:
- Torque check on all connections (5-7 ft-lbs)
- Capacity verification test
- Annually:
- Complete system resistance test
- Battery rotation in multi-bank systems
Risk Mitigation and Failure Prevention
Prevent catastrophic failures with these measures:
- Thermal Runaway Protection: Install battery compartment temperature sensors
- Deep Discharge Prevention: Set controller low-voltage cutoff 0.5V above manufacturer spec
- Water Intrusion Defense: Apply dielectric grease to all electrical connections
Advanced Strategy: Create a battery logbook tracking performance metrics over time to identify degradation patterns before failures occur.
Conclusion: Mastering Golf Cart Battery Maintenance
Throughout this comprehensive guide, we’ve explored the essential techniques for testing, maintaining, and optimizing golf cart batteries – from basic voltage checks to advanced diagnostic methods.
You’ve learned how to properly evaluate battery health, interpret test results, implement professional maintenance routines, and choose the right battery technology for your needs.
Remember that consistent testing and preventive care can double your battery lifespan while avoiding costly breakdowns.
Now equipped with this knowledge, we encourage you to implement a regular testing schedule and share these insights with fellow golf cart owners.
By applying these professional techniques, you’ll enjoy reliable performance round after round, season after season. Your batteries – and your golf game – will thank you.
Frequently Asked Questions About Golf Cart Battery Testing and Maintenance
What’s the most accurate way to test a golf cart battery’s health?
The most comprehensive method combines three tests: voltage check (fully charged 6V should read 6.37V), load test (maintains 4.8V under 75A load for 15 seconds), and specific gravity test (1.265 for flooded batteries).
Professional technicians also measure internal resistance – values above 0.015 ohms for 6V batteries indicate deterioration. Always test batteries individually, even in series systems.
How often should I test my golf cart batteries?
Follow this testing schedule: monthly during peak season, before/after winter storage, and whenever you notice performance drops.
Flooded batteries require more frequent testing (every 2-3 weeks in summer) than AGM or lithium. Competitive players should test weekly during tournament seasons, as voltage drops of just 0.5V can reduce speed by 10%.
Why does my battery show full voltage but dies quickly under load?
This “surface charge” phenomenon indicates sulfation – lead sulfate crystals coating the plates. The voltage reads normally but capacity is reduced. Try a deep discharge/charge cycle or use a desulfating charger. If problem persists after three cycles, the battery likely needs replacement. This condition reduces battery life by 40-60% if left untreated.
Can I mix old and new golf cart batteries?
Never mix batteries with more than 6 months age difference. Older batteries drag down new ones, reducing overall capacity by 30-50%. Always replace entire sets together. If budget requires staggered replacement, rotate positions monthly to equalize wear. For 48V systems, even one weak battery can reduce range by up to 8 miles.
What’s the safest way to clean corroded battery terminals?
Use this professional cleaning method:
1) Disconnect cables (negative first),
2) Apply baking soda/water paste (1:3 ratio),
3) Scrub with brass brush (not steel),
4) Rinse with distilled water,
5) Dry completely,
6) Apply anti-corrosion gel before reconnecting.
Always wear gloves and eye protection – battery acid can cause serious burns.
How do I properly store golf cart batteries for winter?
Follow this 5-step process:
1) Fully charge,
2) Clean terminals,
3) Disconnect all cables,
4) Store in cool (50-60°F), dry place,
5) Use maintainer or charge monthly.
For flooded batteries, check water levels monthly. Never store on concrete – use wooden pallets to prevent temperature differentials that accelerate discharge.
Are lithium batteries worth the higher cost for golf carts?
Lithium becomes cost-effective if you:
1) Use cart frequently (3+ times weekly),
2) Keep carts 5+ years,
3) Need maximum range, or
4) Have hilly terrain.
They provide 2-3x more cycles, 30% more range, and charge 3x faster. The break-even point is typically 2-3 years for heavy users.
Why does my battery charger shut off prematurely?
Common causes include:
1) Faulty temperature sensor (try cooling battery),
2) High resistance connections (clean terminals),
3) Weak cell (load test each battery), or
4) Incompatible charger (verify voltage/amp ratings).
Modern smart chargers may abort if they detect abnormal voltage spikes – try a manual charger to verify.